- Serves: 30 People
- Prepare Time: -
- Cooking Time: 3 hours 30
- Calories: 3030
- Difficulty:
Easy
Print
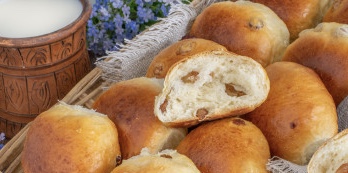
Surely you also love raisin buns, right? Delicate, airy, sweet, with a ruddy crust and fluffy crumb - just lovely! And, of course, a lot of raisins - excellent pastries for family tea drinking according to a proven recipe.
You don't have to take fast-acting yeast - just dry (also 1.5 teaspoons - 5 grams) or pressed (you need 3 times more, that is, 15 grams) are perfect. Such yeast is not immediately mixed with flour, but pre-activated in a warm sweetish liquid for 10-15 minutes. In our case, you can slightly warm up half a glass of kefir with a tablespoon of sugar and dissolve yeast in it.
Instead of kefir of any fat content, you can safely use sour milk, yogurt and even fermented baked milk (it has a special aroma of baked milk). Choose medium-sized chicken eggs (about 50 grams each), and the amount of sugar can be reduced or increased (if desired).
In total, from the specified amount of ingredients used in the recipe, 20 lush and aromatic homemade raisin buns are obtained. To keep baked goods fresh for a long time, store them airtight (for example, in a tightly tied bag) at room temperature.
Ingredients
Directions
- To make such homemade buns, we need the following ingredients: premium wheat flour, kefir or sour milk of any fat content, chicken eggs, raisins, granulated sugar and vanilla sugar, vegetable oil, salt and fast-acting yeast. All foods should be at room temperature.
- Sift wheat flour (500 grams) into a bowl (preferably twice). Thanks to sifting, the flour is not only loosened and saturated with oxygen, but possible debris is also removed. I use 500 grams of flour, since I use a product of the same brand (Lidskaya) - you may need a little more or a little less.
- Add to the flour 1.5 teaspoons (1 heaping spoon) of fast-acting yeast, 100 grams of sugar oven, 1 teaspoon of vanilla sugar (can be replaced with a pinch of vanillin) and half a teaspoon of salt (preferably finely ground).
- Mix thoroughly with a fork or whisk so that all dry ingredients are evenly distributed throughout the mixture.
- We make a depression in the flour mixture and pour 250 milliliters of kefir (sour milk) at room temperature into it. You can warm it up quite a bit, just a little. We also need 2 medium-sized chicken eggs - add 2 whites and 1 yolk to a bowl. The second yolk will be useful to us later (for lubricating the workpieces).
- We mix all the products - you can use your hand or a fork (as it is convenient for anyone). When the flour is moistened, absorbed moisture, add three tablespoons of odorless vegetable oil. I use refined sunflower.
- You need to knead this yeast dough for quite a long time (at least 10, and preferably 15 minutes) and intensively. As a result, it will become smooth, uniform, soft enough and not sticky. We round the dough into a ball and put it in a bowl, which we literally grease with a teaspoon of vegetable oil (I did not indicate it in the ingredients) so that it does not stick to the dishes during fermentation. We send the yeast dough to heat for 1 hour. Where is the best place for dough to roam and what does a warm place mean? There are several options. First of all, in the oven with the light on (it turns out about 28-30 degrees - the ideal temperature for fermenting yeast dough). Then we tighten the bowl with the dough with cling film or cover it with a towel made of natural fabric (linen is best suited) so that the surface does not wind up and does not become covered with a crust. You can also let the dough ferment in the microwave, in which we first bring a glass of water to a boil. The dough will rise with the door closed, and the glass will stand in the same place. Then the bowl does not need to be closed with anything, since the water will evaporate, thereby maintaining the necessary humidity. Just make sure that no one accidentally turns on the microwave, otherwise the dough will disappear and there will be no baking.
- After 1 hour (time is a relative concept, it may take more or less) the yeast dough on kefir will rise very well, increase in volume by about 2-2.5 times. It is very soft and fluffy. If the dough rises poorly, then you have come across old yeast - increase the fermentation time.
- While the yeast dough was fermenting, we prepared 100 grams of raisins. It needs to be rinsed, and then steamed for five minutes in boiling water to make it softer. If you bought an elastic and not dry raisins, just rinse them, dry them and dust them with wheat flour. We transfer the dough to the work surface, knead it into a layer and stir in the raisins.
- Re-round the yeast dough and heat again for another 40-50 minutes.
- During this time, it will once again rise very well, become even more tender and fluffy.
- Shaping raisin buns is very simple - just make them round. How to round off the pieces can be found in the recipe for whole grain buns (steps 10-15). In total, from the specified number of ingredients, I made 20 blanks.
- Transfer the balls to a baking sheet, which I advise you to cover with baking paper, seam down.
- Cover the blanks with a light towel or film, which must be rubbed with flour so that the dough does not stick, and leave for 25-30 minutes. The proving time of buns depends not only on the strength of the yeast, but also on the temperature in the room.
- This is how the blanks looked after 30 minutes - it's time to bake them. In advance (20-30 minutes), we did not forget to turn on the oven to warm up by 180 degrees.
- Before planting in a preheated oven, grease the surface of the workpieces with egg yolk (you can add a tablespoon of water or milk to it and mix thoroughly).
- We bake homemade raisin buns at 180 degrees for about 30-35 minutes. It may take a little less or more time - focus on the appearance of the products and the nature of your oven (I have gas, bottom heating, no convection). The finished buns can be sprinkled with powdered sugar if you like.
- Fresh and flavorful buns just can't help but please. Cook for your health, friends, and bon appetit!
Raisin buns
- Serves: 30 People
- Prepare Time: -
- Cooking Time: 3 hours 30
- Calories: 3030
- Difficulty:
Easy
Surely you also love raisin buns, right? Delicate, airy, sweet, with a ruddy crust and fluffy crumb - just lovely! And, of course, a lot of raisins - excellent pastries for family tea drinking according to a proven recipe.
You don't have to take fast-acting yeast - just dry (also 1.5 teaspoons - 5 grams) or pressed (you need 3 times more, that is, 15 grams) are perfect. Such yeast is not immediately mixed with flour, but pre-activated in a warm sweetish liquid for 10-15 minutes. In our case, you can slightly warm up half a glass of kefir with a tablespoon of sugar and dissolve yeast in it.
Instead of kefir of any fat content, you can safely use sour milk, yogurt and even fermented baked milk (it has a special aroma of baked milk). Choose medium-sized chicken eggs (about 50 grams each), and the amount of sugar can be reduced or increased (if desired).
In total, from the specified amount of ingredients used in the recipe, 20 lush and aromatic homemade raisin buns are obtained. To keep baked goods fresh for a long time, store them airtight (for example, in a tightly tied bag) at room temperature.
Ingredients
Directions
- To make such homemade buns, we need the following ingredients: premium wheat flour, kefir or sour milk of any fat content, chicken eggs, raisins, granulated sugar and vanilla sugar, vegetable oil, salt and fast-acting yeast. All foods should be at room temperature.
- Sift wheat flour (500 grams) into a bowl (preferably twice). Thanks to sifting, the flour is not only loosened and saturated with oxygen, but possible debris is also removed. I use 500 grams of flour, since I use a product of the same brand (Lidskaya) - you may need a little more or a little less.
- Add to the flour 1.5 teaspoons (1 heaping spoon) of fast-acting yeast, 100 grams of sugar oven, 1 teaspoon of vanilla sugar (can be replaced with a pinch of vanillin) and half a teaspoon of salt (preferably finely ground).
- Mix thoroughly with a fork or whisk so that all dry ingredients are evenly distributed throughout the mixture.
- We make a depression in the flour mixture and pour 250 milliliters of kefir (sour milk) at room temperature into it. You can warm it up quite a bit, just a little. We also need 2 medium-sized chicken eggs - add 2 whites and 1 yolk to a bowl. The second yolk will be useful to us later (for lubricating the workpieces).
- We mix all the products - you can use your hand or a fork (as it is convenient for anyone). When the flour is moistened, absorbed moisture, add three tablespoons of odorless vegetable oil. I use refined sunflower.
- You need to knead this yeast dough for quite a long time (at least 10, and preferably 15 minutes) and intensively. As a result, it will become smooth, uniform, soft enough and not sticky. We round the dough into a ball and put it in a bowl, which we literally grease with a teaspoon of vegetable oil (I did not indicate it in the ingredients) so that it does not stick to the dishes during fermentation. We send the yeast dough to heat for 1 hour. Where is the best place for dough to roam and what does a warm place mean? There are several options. First of all, in the oven with the light on (it turns out about 28-30 degrees - the ideal temperature for fermenting yeast dough). Then we tighten the bowl with the dough with cling film or cover it with a towel made of natural fabric (linen is best suited) so that the surface does not wind up and does not become covered with a crust. You can also let the dough ferment in the microwave, in which we first bring a glass of water to a boil. The dough will rise with the door closed, and the glass will stand in the same place. Then the bowl does not need to be closed with anything, since the water will evaporate, thereby maintaining the necessary humidity. Just make sure that no one accidentally turns on the microwave, otherwise the dough will disappear and there will be no baking.
- After 1 hour (time is a relative concept, it may take more or less) the yeast dough on kefir will rise very well, increase in volume by about 2-2.5 times. It is very soft and fluffy. If the dough rises poorly, then you have come across old yeast - increase the fermentation time.
- While the yeast dough was fermenting, we prepared 100 grams of raisins. It needs to be rinsed, and then steamed for five minutes in boiling water to make it softer. If you bought an elastic and not dry raisins, just rinse them, dry them and dust them with wheat flour. We transfer the dough to the work surface, knead it into a layer and stir in the raisins.
- Re-round the yeast dough and heat again for another 40-50 minutes.
- During this time, it will once again rise very well, become even more tender and fluffy.
- Shaping raisin buns is very simple - just make them round. How to round off the pieces can be found in the recipe for whole grain buns (steps 10-15). In total, from the specified number of ingredients, I made 20 blanks.
- Transfer the balls to a baking sheet, which I advise you to cover with baking paper, seam down.
- Cover the blanks with a light towel or film, which must be rubbed with flour so that the dough does not stick, and leave for 25-30 minutes. The proving time of buns depends not only on the strength of the yeast, but also on the temperature in the room.
- This is how the blanks looked after 30 minutes - it's time to bake them. In advance (20-30 minutes), we did not forget to turn on the oven to warm up by 180 degrees.
- Before planting in a preheated oven, grease the surface of the workpieces with egg yolk (you can add a tablespoon of water or milk to it and mix thoroughly).
- We bake homemade raisin buns at 180 degrees for about 30-35 minutes. It may take a little less or more time - focus on the appearance of the products and the nature of your oven (I have gas, bottom heating, no convection). The finished buns can be sprinkled with powdered sugar if you like.
- Fresh and flavorful buns just can't help but please. Cook for your health, friends, and bon appetit!
You may also like


.jpg)


