Sesame mini baguettes

Bread 934 Last Update: Jul 22, 2021 Created: Jul 22, 2021 0 0 0
Sesame mini baguettes
  • Serves: -
  • Prepare Time: -
  • Cooking Time: -
  • Calories: -
  • Difficulty: Medium
Print

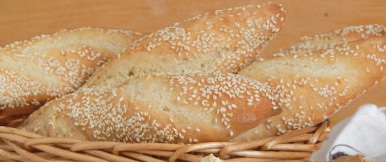
Homemade bread is not only shaped bricks and hearth loaves, rolls, crumpets or loaves. The baguette also belongs to bread and this is the recipe I will share with you today. I suggest trying mini baguettes with sesame seeds: you will find a thin crispy crust and a very soft, tender and airy crumb.

You can cook miniature baguettes using both premium and first grade wheat flour. True, then adjust its amount yourself. I will write about yeast below. A total of 8 portioned mini-baguettes are obtained from the specified amount of ingredients used, but if you wish, you can make both more or less homemade baked goods.
Ingredients

Directions

  1. We will prepare products for making homemade mini-baguettes: water, premium wheat flour, sugar, salt, fast-acting yeast and white (or black or a mixture thereof) sesame. You don't have to take fast-acting yeast - just dry (3/4 teaspoon is about 2 grams) or pressed / fresh (we take 3 times more, that is, about 6 grams) are perfect. Such yeast is not immediately mixed with flour, but pre-activated in a warm sweetish liquid for 10-15 minutes. In our case, you can slightly warm up half a glass of water with a teaspoon of sugar and dissolve the yeast in it.
  2. We sift wheat flour of the highest grade into a bowl convenient for kneading - this will help saturate it with oxygen and get rid of possible inclusions of debris.
  3. Now add fast-acting yeast, salt and sugar to the flour. We mix everything.
  4. Pour warm (warmth should be pleasant to the hand) water to the bulk ingredients and knead the dough.
  5. You need to knead this yeast dough for a rather long time (about 10 minutes) - during this time it will become smooth, homogeneous, very soft and tender, while slightly sticky. We round the dough into a ball and put it in a bowl, which we grease with a drop of vegetable oil (I did not indicate it in the ingredients) so that it does not stick to the dishes during fermentation.
  6. We roll the dough into a ball and leave it in a bowl for 1 hour at room temperature, after which we do a light kneading, re-rounding and fermentation again for another 1 hour. Where is the best place for dough to roam and what does a warm place mean? There are several options. First of all, in the oven with the light on (it turns out about 28-30 degrees - the ideal temperature for fermenting yeast dough). Then we tighten the bowl with the dough with cling film or cover it with a towel made of natural fabric (linen is best suited) so that the surface does not wind up and does not become covered with a crust. You can also let the dough ferment in the microwave, in which we first bring a glass of water to a boil. The dough will rise with the door closed, and the glass will stand in the same place. Then the bowl does not need to be closed with anything, since the water will evaporate, thereby maintaining the necessary humidity. Just make sure that no one inadvertently turns on the microwave, otherwise the dough will disappear and there will be no baguettes. For 2 hours of fermentation, the bun will grow well and increase in volume 4 times.
  7. I decided to make 8 mini baguettes, but you can mold more or less. Divide the dough into 8 pieces of the same size.
  8. We round them, giving the shape of koloboks. Let it sit for 5 minutes to rest the dough.
  9. We take one piece of yeast dough and gently knead it with our palms on the working surface, slightly powdered with wheat flour. Cover the rest of the dough pieces with a towel or cling film so that they do not dry out or become crusty.
  10. Divide the dough into 3 parts visually. We fold one edge to the center, sealing the seam with a short punching with the edge of the palm.
  11. We repeat in the same way with the second end of the workpiece.
  12. Now fold the dough in half along the seam and seal the seam in the same way.
  13. And now we roll the blank on the table with our palms to make a tourniquet. In thickness, it turns out to be about 3-4 centimeters.
  14. We do the same with the rest of the dough pieces.
  15. Spray the workpieces lightly with water and roll them in sesame seeds. Now our future mini-baguettes need to distance themselves, that is, rest and get up - about 30 minutes in the warmth. I have a special baking dish for baguettes, but you can use a regular baking sheet, which I advise you to line with parchment paper. About 20 minutes before the start of baking, turn on the oven to warm up - 250 degrees. We put a bowl of water on the bottom of the oven - mini-baguettes are first baked in a water bath. When the workpieces have doubled in volume, they can be baked. Additionally, I made 2 oblique cuts with a blade.
  16. We cook mini-baguettes at 250 degrees for a couple (instead of dishes with water, you can throw several large pieces of ice on the bottom right after planting the blanks in the oven and immediately close the door) for the first 10 minutes. Then we remove the bowl of water, lower the temperature to 200 degrees and bake the baguettes for about 15 minutes more.
  17. Remove the finished mini-baguettes from the baking sheet or cool directly in the mold (if you have a baguette holder, there are holes in it). It's time to enjoy fresh, flavorful, crispy baked goods. By the way, they are so good still warm that they hardly have time to cool down completely.
  18. Thin crispy crust and very soft, tender and airy crumb. Be sure to try it, friends!

Sesame mini baguettes


  • Serves: -
  • Prepare Time: -
  • Cooking Time: -
  • Calories: -
  • Difficulty: Medium

Homemade bread is not only shaped bricks and hearth loaves, rolls, crumpets or loaves. The baguette also belongs to bread and this is the recipe I will share with you today. I suggest trying mini baguettes with sesame seeds: you will find a thin crispy crust and a very soft, tender and airy crumb.

You can cook miniature baguettes using both premium and first grade wheat flour. True, then adjust its amount yourself. I will write about yeast below. A total of 8 portioned mini-baguettes are obtained from the specified amount of ingredients used, but if you wish, you can make both more or less homemade baked goods.

Ingredients

Directions

  1. We will prepare products for making homemade mini-baguettes: water, premium wheat flour, sugar, salt, fast-acting yeast and white (or black or a mixture thereof) sesame. You don't have to take fast-acting yeast - just dry (3/4 teaspoon is about 2 grams) or pressed / fresh (we take 3 times more, that is, about 6 grams) are perfect. Such yeast is not immediately mixed with flour, but pre-activated in a warm sweetish liquid for 10-15 minutes. In our case, you can slightly warm up half a glass of water with a teaspoon of sugar and dissolve the yeast in it.
  2. We sift wheat flour of the highest grade into a bowl convenient for kneading - this will help saturate it with oxygen and get rid of possible inclusions of debris.
  3. Now add fast-acting yeast, salt and sugar to the flour. We mix everything.
  4. Pour warm (warmth should be pleasant to the hand) water to the bulk ingredients and knead the dough.
  5. You need to knead this yeast dough for a rather long time (about 10 minutes) - during this time it will become smooth, homogeneous, very soft and tender, while slightly sticky. We round the dough into a ball and put it in a bowl, which we grease with a drop of vegetable oil (I did not indicate it in the ingredients) so that it does not stick to the dishes during fermentation.
  6. We roll the dough into a ball and leave it in a bowl for 1 hour at room temperature, after which we do a light kneading, re-rounding and fermentation again for another 1 hour. Where is the best place for dough to roam and what does a warm place mean? There are several options. First of all, in the oven with the light on (it turns out about 28-30 degrees - the ideal temperature for fermenting yeast dough). Then we tighten the bowl with the dough with cling film or cover it with a towel made of natural fabric (linen is best suited) so that the surface does not wind up and does not become covered with a crust. You can also let the dough ferment in the microwave, in which we first bring a glass of water to a boil. The dough will rise with the door closed, and the glass will stand in the same place. Then the bowl does not need to be closed with anything, since the water will evaporate, thereby maintaining the necessary humidity. Just make sure that no one inadvertently turns on the microwave, otherwise the dough will disappear and there will be no baguettes. For 2 hours of fermentation, the bun will grow well and increase in volume 4 times.
  7. I decided to make 8 mini baguettes, but you can mold more or less. Divide the dough into 8 pieces of the same size.
  8. We round them, giving the shape of koloboks. Let it sit for 5 minutes to rest the dough.
  9. We take one piece of yeast dough and gently knead it with our palms on the working surface, slightly powdered with wheat flour. Cover the rest of the dough pieces with a towel or cling film so that they do not dry out or become crusty.
  10. Divide the dough into 3 parts visually. We fold one edge to the center, sealing the seam with a short punching with the edge of the palm.
  11. We repeat in the same way with the second end of the workpiece.
  12. Now fold the dough in half along the seam and seal the seam in the same way.
  13. And now we roll the blank on the table with our palms to make a tourniquet. In thickness, it turns out to be about 3-4 centimeters.
  14. We do the same with the rest of the dough pieces.
  15. Spray the workpieces lightly with water and roll them in sesame seeds. Now our future mini-baguettes need to distance themselves, that is, rest and get up - about 30 minutes in the warmth. I have a special baking dish for baguettes, but you can use a regular baking sheet, which I advise you to line with parchment paper. About 20 minutes before the start of baking, turn on the oven to warm up - 250 degrees. We put a bowl of water on the bottom of the oven - mini-baguettes are first baked in a water bath. When the workpieces have doubled in volume, they can be baked. Additionally, I made 2 oblique cuts with a blade.
  16. We cook mini-baguettes at 250 degrees for a couple (instead of dishes with water, you can throw several large pieces of ice on the bottom right after planting the blanks in the oven and immediately close the door) for the first 10 minutes. Then we remove the bowl of water, lower the temperature to 200 degrees and bake the baguettes for about 15 minutes more.
  17. Remove the finished mini-baguettes from the baking sheet or cool directly in the mold (if you have a baguette holder, there are holes in it). It's time to enjoy fresh, flavorful, crispy baked goods. By the way, they are so good still warm that they hardly have time to cool down completely.
  18. Thin crispy crust and very soft, tender and airy crumb. Be sure to try it, friends!

Add Your Comment

You may also like

Newsletter

Sign up to receive email updates on new recipes.