- Serves: -
- Prepare Time: -
- Cooking Time: -
- Calories: -
- Difficulty:
Easy
Print
The downy, almost weightless crumb and thin, pale crust of this nostalgic pastry will surely be remembered by many who were born during the Soviet era. Then the freshest Stolichny buns were sold in any bakery for 3 kopecks, and today you can easily bake them at home and treat your children. Let them taste our childhood too!
The recipe for these wheat buns is very simple and doesn't require any special baking skills. Wheat flour is used of the highest grade (its amount depends on the moisture content of the product and may differ from that specified in the recipe), drinking water, high-quality butter, and granulated sugar - the most common.
Regarding yeast: according to the recipe, pressed ones are required (I cut the amount by half compared to the original), but they can be replaced with dry (5 grams is 1 heaped teaspoon) or fast-acting (also 5 grams). The latter do not dissolve in water, but are immediately mixed with wheat flour.
In total, from the specified amount of ingredients used, 16 Stolichny buns are obtained, each weighing 50 grams. To taste, these pastries are quite neutral, reminiscent of simple white bread, so buns can be served with first courses, made sandwiches with them, or eaten with butter, jam and tea for breakfast.
Ingredients
Directions
- To make these simple yeast buns, we need the following ingredients: premium wheat flour, water, butter, yeast, salt and sugar.
- In slightly warm (pleasant to the touch, but by no means hot) drinking water we dissolve yeast and granulated sugar.
- We mix everything thoroughly so that nothing lies at the bottom.
- In a dish suitable for kneading and fermenting the dough, sift (preferably twice) 500 grams of wheat flour. Thanks to this, it will not only loosen and saturate with oxygen, but also possible debris will go away. You may need more or less flour than indicated in the recipe. Add salt (preferably finely ground).
- Stir so that the salt spreads evenly over the dry mixture. We make a deepening and pour the yeast cocktail into it.
- At first, you can mix dry components with liquid components simply using a tablespoon or spatula. When the flour is moistened, add soft butter.
- It takes a long time to knead the dough for Stolichny buns (a kneader with a hook attachment can handle it in 10-12 minutes, and you will have to work with your hands for about 20 minutes). As a result, it will become smooth, uniform, unusually soft and almost non-sticky. We round the dough into a ball and put it in a bowl, which we literally grease with a drop of odorless vegetable oil (I did not indicate it in the recipe) so that it does not stick to the dishes during fermentation. We send the dough to heat until it doubles in volume at least. This can take 30 minutes or more than an hour - it all depends on the activity of the yeast. Where is the best place for dough to roam and what does a warm place mean? There are several options. First of all, in the oven with the light on (it turns out about 28-30 degrees - the ideal temperature for fermenting yeast dough). Then we tighten the bowl with the dough with cling film or cover with a towel made of natural fabric (linen is best suited) so that the surface does not wind up and does not become covered with a crust. You can also let the dough ferment in the microwave, in which we first bring a glass of water to a boil. The dough will rise with the door closed, and the glass will stand in the same place. Then the bowl does not need to be closed with anything, since the water will evaporate, thereby maintaining the necessary humidity. Just make sure that no one accidentally turns on the microwave, otherwise the dough will disappear and there will be no homemade buns.
- When the dough grows twice or a little more, we knead and put it back in the heat until it increases in volume again. I have a yeast dough in the photo after 50 minutes of the second fermentation.
- We cut the dough into pieces on a surface dusted with flour - I have 16 pieces, 55 grams each (I weighed the dough on a scale). Why is it so important that the buns are the same size? First of all, they will need the same amount of time for both proofing and baking. Well, the aesthetic side is also important. Before shaping the dough pieces (cover with cling film or a light towel), you need to rest for 10 minutes so that the dough is relaxed and easier to be physically stimulated.
- Forming these buns is very simple and straightforward. Sprinkle a piece of dough with wheat flour a little so that it does not stick to your hands. Then with the palm of our hand we beat the dough into a cake several times to remove excess air - there are no big pores in the finished buns.
- Now we round off the workpiece - we pull the dough from the edges to the center, pressing with our fingers so that it does not crawl back.
- We pinch the seam well so that the workpieces are not deformed during the proofing process.
- Turn the dough ball over with the seam down and round the future buns. It's quite difficult for me to show the process without video, but I'll try to describe it. We squeeze the working palm, spreading our fingers, as if holding a large orange. We cover the workpiece with our palm in this position and begin to rotate the dough ball counterclockwise. Everything happens easily and effortlessly, while we kind of bend the dough inward with 4 fingers, but without pressure.
- Thus, we will roll up all 16 blanks for the Capital buns. They come out so neat and smooth. We transfer the balls to a baking sheet, which I advise you to cover with baking paper (I sprinkled it lightly with flour, since the parchment is not of the best quality), seam down.
- Cover the blanks with a film (a very light towel), which must be rubbed with flour so that the dough does not stick, and leave at 27-29 degrees for 25-30 minutes. The proofing time of these wheat buns depends not only on the strength of the yeast, but also on the temperature in the room.
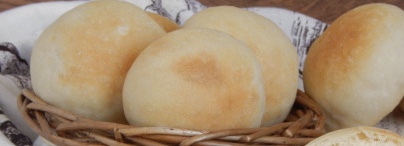
- We bake our homemade buns at 250 degrees in a preheated oven on medium level with steam for about 15-20 minutes. Do not expect that the crust of the buns will be too ruddy - we did not grease them with anything. For a light tan, I simply moved the baking sheet to the bottom of the oven and browned them under the grill for the last 5 minutes. For a steam bath, you need to put dishes with boiling water on the bottom of the oven or immediately after planting the blanks, throw several large pieces of ice on the bottom and immediately close the door.
- Well, what could be better than the aroma of freshly baked homemade bread? Stolichny buns are so tasty, but it's hard not to gobble up a couple of them while still hot. Friends, cook for your health and bon appetit!
Stolichny buns
- Serves: -
- Prepare Time: -
- Cooking Time: -
- Calories: -
- Difficulty:
Easy
The downy, almost weightless crumb and thin, pale crust of this nostalgic pastry will surely be remembered by many who were born during the Soviet era. Then the freshest Stolichny buns were sold in any bakery for 3 kopecks, and today you can easily bake them at home and treat your children. Let them taste our childhood too!
The recipe for these wheat buns is very simple and doesn't require any special baking skills. Wheat flour is used of the highest grade (its amount depends on the moisture content of the product and may differ from that specified in the recipe), drinking water, high-quality butter, and granulated sugar - the most common.
Regarding yeast: according to the recipe, pressed ones are required (I cut the amount by half compared to the original), but they can be replaced with dry (5 grams is 1 heaped teaspoon) or fast-acting (also 5 grams). The latter do not dissolve in water, but are immediately mixed with wheat flour.
In total, from the specified amount of ingredients used, 16 Stolichny buns are obtained, each weighing 50 grams. To taste, these pastries are quite neutral, reminiscent of simple white bread, so buns can be served with first courses, made sandwiches with them, or eaten with butter, jam and tea for breakfast.
Ingredients
Directions
- To make these simple yeast buns, we need the following ingredients: premium wheat flour, water, butter, yeast, salt and sugar.
- In slightly warm (pleasant to the touch, but by no means hot) drinking water we dissolve yeast and granulated sugar.
- We mix everything thoroughly so that nothing lies at the bottom.
- In a dish suitable for kneading and fermenting the dough, sift (preferably twice) 500 grams of wheat flour. Thanks to this, it will not only loosen and saturate with oxygen, but also possible debris will go away. You may need more or less flour than indicated in the recipe. Add salt (preferably finely ground).
- Stir so that the salt spreads evenly over the dry mixture. We make a deepening and pour the yeast cocktail into it.
- At first, you can mix dry components with liquid components simply using a tablespoon or spatula. When the flour is moistened, add soft butter.
- It takes a long time to knead the dough for Stolichny buns (a kneader with a hook attachment can handle it in 10-12 minutes, and you will have to work with your hands for about 20 minutes). As a result, it will become smooth, uniform, unusually soft and almost non-sticky. We round the dough into a ball and put it in a bowl, which we literally grease with a drop of odorless vegetable oil (I did not indicate it in the recipe) so that it does not stick to the dishes during fermentation. We send the dough to heat until it doubles in volume at least. This can take 30 minutes or more than an hour - it all depends on the activity of the yeast. Where is the best place for dough to roam and what does a warm place mean? There are several options. First of all, in the oven with the light on (it turns out about 28-30 degrees - the ideal temperature for fermenting yeast dough). Then we tighten the bowl with the dough with cling film or cover with a towel made of natural fabric (linen is best suited) so that the surface does not wind up and does not become covered with a crust. You can also let the dough ferment in the microwave, in which we first bring a glass of water to a boil. The dough will rise with the door closed, and the glass will stand in the same place. Then the bowl does not need to be closed with anything, since the water will evaporate, thereby maintaining the necessary humidity. Just make sure that no one accidentally turns on the microwave, otherwise the dough will disappear and there will be no homemade buns.
- When the dough grows twice or a little more, we knead and put it back in the heat until it increases in volume again. I have a yeast dough in the photo after 50 minutes of the second fermentation.
- We cut the dough into pieces on a surface dusted with flour - I have 16 pieces, 55 grams each (I weighed the dough on a scale). Why is it so important that the buns are the same size? First of all, they will need the same amount of time for both proofing and baking. Well, the aesthetic side is also important. Before shaping the dough pieces (cover with cling film or a light towel), you need to rest for 10 minutes so that the dough is relaxed and easier to be physically stimulated.
- Forming these buns is very simple and straightforward. Sprinkle a piece of dough with wheat flour a little so that it does not stick to your hands. Then with the palm of our hand we beat the dough into a cake several times to remove excess air - there are no big pores in the finished buns.
- Now we round off the workpiece - we pull the dough from the edges to the center, pressing with our fingers so that it does not crawl back.
- We pinch the seam well so that the workpieces are not deformed during the proofing process.
- Turn the dough ball over with the seam down and round the future buns. It's quite difficult for me to show the process without video, but I'll try to describe it. We squeeze the working palm, spreading our fingers, as if holding a large orange. We cover the workpiece with our palm in this position and begin to rotate the dough ball counterclockwise. Everything happens easily and effortlessly, while we kind of bend the dough inward with 4 fingers, but without pressure.
- Thus, we will roll up all 16 blanks for the Capital buns. They come out so neat and smooth. We transfer the balls to a baking sheet, which I advise you to cover with baking paper (I sprinkled it lightly with flour, since the parchment is not of the best quality), seam down.
- Cover the blanks with a film (a very light towel), which must be rubbed with flour so that the dough does not stick, and leave at 27-29 degrees for 25-30 minutes. The proofing time of these wheat buns depends not only on the strength of the yeast, but also on the temperature in the room.
- We bake our homemade buns at 250 degrees in a preheated oven on medium level with steam for about 15-20 minutes. Do not expect that the crust of the buns will be too ruddy - we did not grease them with anything. For a light tan, I simply moved the baking sheet to the bottom of the oven and browned them under the grill for the last 5 minutes. For a steam bath, you need to put dishes with boiling water on the bottom of the oven or immediately after planting the blanks, throw several large pieces of ice on the bottom and immediately close the door.
- Well, what could be better than the aroma of freshly baked homemade bread? Stolichny buns are so tasty, but it's hard not to gobble up a couple of them while still hot. Friends, cook for your health and bon appetit!
You may also like


.jpg)


