- Serves: -
- Prepare Time: -
- Cooking Time: -
- Calories: -
- Difficulty:
Easy
Print
One of the oldest types of white bread, which has been baked in Russia from time immemorial. In terms of texture and taste, ready-made Moscow rolls can be compared to French baguettes - they differ in the same well-bore crumb and thin crispy crust. It is believed that only professionals can cook a Moscow roll, but today I propose to break this stereotype and make it at home with your own hands!
In Ancient Russia, it was customary to bake rolls in the form of a castle with a round bow. These pastries were sold on the street, and the townspeople ate them right on the go, holding by this shackle (handle). Interestingly, for reasons of hygiene, the pen itself was not used for food - it was given to the beggars or thrown to the dogs. There is a version that about those people who did not disdain to eat the shackle from the roll, they said: "I got to the handle." Today the expression “to reach the pen” means to lose human form, to completely sink.
An exclusively Russian invention - the form and names for individual parts of the roll. The most prominent, plump part of this pastry is called the tummy. There is a lip on it (the upper swollen part, which is obtained by notching the workpiece). Well, and, of course, a handle, or, as it is correct, a bow (in ancient times it was called a re-bind). Each part of the roll is characterized by its own flavor nuances, since a different shape and volume, even with the same baking time, give a different degree of browning.
Its a bit of history. For a long time in Russia, not only Moscow kalachs, but also Murom ones were known. Murom rolls were made from sieve dough (that is, the flour was passed not through a sieve, but a sieve). The main feature of the Murom rolls crumb was its wellness. The dough for this baking was crushed (“rubbed”) with hands on ice for a long time, due to which the carbon dioxide contained in it did not evaporate, and the finished products turned out to be highly porous, with large internal voids. It is because of this that the second name for the Murom roll is grated.
Ingredients
Directions
- To prepare this simple but very tasty homemade bread, we will use premium wheat flour, warm water, salt and yeast. I use fast-acting yeast (1.5 grams), but you can replace it with dry in the same amount or pressed / fresh / wet (three times more, that is, 5 grams). In the second case, you need to dissolve the yeast with warm water and let it stand for 10-15 minutes, then combine with flour and salt.
- Sift 450 grams of premium wheat flour into a suitable dish to get rid of impurities. The remaining 50 grams are not needed yet - we will use this flour to form products.
- Add 8 grams of salt to the flour (1 teaspoon with a small pea) and half a teaspoon of fast-acting yeast (what kind of yeast you have, always read on the package).
- Mix the contents of the bowl thoroughly so that the salt and yeast spread evenly over the flour. We make a depression in the flour mixture and pour water into it. But not all at once, but for a start, about 300 milliliters (it took me exactly 315 milliliters). Then look at the consistency of the dough. We begin to delicately mix the ingredients, without much effort, but just so that everything is connected.
- The dough turns out to be a little sticky, loose, uneven and not smooth - it should be so. It is not necessary to knead it for a long time - the main thing is that there are no dry flour fragments left.
- Round the dough, wash the bowl and wipe it dry. Lubricate the dishes with a very small amount of vegetable oil (about a third of a teaspoon - I did not indicate this ingredient) just so that the dough does not stick. We tighten the bowl with cling film or cover with a towel so that the surface of the dough does not wind up and does not become crusty. We will have a two-phase dough fermentation process: first, it will ferment in warmth at room temperature (ideally 25 degrees), and then in a cool place (in the refrigerator). So, leave the dough warm for 1 hour.
- During this time, the dough will swell, become looser - the fermentation process has begun. In this recipe for homemade bread, we will use a technique called "stretch and fold", which means "stretch and fold" in English. This is how we will act on the dough (stretch and fold), due to which gluten will develop, and the dough itself is not only smooth, but also very porous. It must be said that this is the best way to passively develop gluten in the dough.
- I will try to show in the photo how it looks in the process without video. So, moisten our hands a little with water, take the far edge of the dough, spread it to the sides and fold it to the near side. At this stage, you will already notice a difference in the consistency and texture of the dough: it has become smooth, stretches well and does not tear.
- We turn the bowl over and repeat the manipulations: from the far edge we pull the dough with both hands (do not forget to moisten them in water after each time) and put it back to the near side. Due to the fact that we greased the dishes with oil, the dough practically does not stick to it, thus the gluten frame will be perfectly preserved.
- It remains to stretch and fold the dough in the same way two more times. From a narrower edge, stretch and fold the dough towards you, then turn the bowl over 180 degrees and repeat the action.
- It turns out to be an almost square workpiece.
- It must be turned over with the seam downward, parallel to giving the dough a slightly rounded shape. Now you will need to leave the dough at room temperature for another 2 hours, during which two similar folds should be made with an interval of 1 hour. That is, in total, it turns out 3 hours of fermentation in heat and 3 folds of the dough.
- After 3 hours at room temperature, the dough will change a lot: it will not only noticeably increase in volume, but will also become more porous and airy. When stretched, the dough stretches perfectly and does not tear.
- Now you need to stretch and fold the dough again, then turn the piece over with the seam down, tighten the bowl with plastic wrap and put it in the refrigerator. What is the need for cold fermentation? The fact is that at low temperatures the fermentation process slows down, while the accumulation of flavoring qualities becomes more intense. Thus, the dough ferments longer than in warmth, but the taste of the finished product is richer and more pronounced. The dough will stay in the refrigerator for another 1 hour and 40 minutes. It will need to be stretched twice more and folded every 50 minutes, after which it will be possible to mold future Moscow rolls.
- After the allotted time (almost 5 hours) of fermentation in warm and cold, the dough became somewhat stronger and more elastic - it does not blur and keeps its shape. In addition, the dough is no longer too sticky.
- Remember we left 50 grams of wheat flour? And now we need it. Lightly dust the work surface with flour and put the dough out of the bowl.
- In total, we will get 4 rather large Moscow rolls, so we divide the dough into 4 parts. This is most conveniently done with a scraper, but you can cut it with a knife.
- Now, for accuracy, you need to weigh the pieces of dough. By the way, it is best to immediately weigh the entire dough, so that later it will be more convenient to calculate the required mass of each piece. An equal amount is needed not only for greater aesthetics, but also so that the workpieces are deformed at the same speed and baked at the same time.
- Carefully squeeze a little air out of the dough, round off the pieces of dough, rolling them into denser pieces. Let them rest for 10 minutes at room temperature, covering them with cling film or a towel so that the top does not wind up.
- After 10 minutes, the dough will rest and relax - you can proceed to molding the Moscow rolls.
- To do this, we spread the blank into a flatter cake, gently pressing the dough with our fingers to the table. Just don't press hard to keep the air out.
- Now we spread the far edge of the dough with our fingers to the sides and press it to the center. We seal the seam (just with the edge of the palm we punch the dough with a quick but clear movement).
- Turn the workpiece over 180 degrees and repeat the movement from the opposite side.
- Seal the seam again with a short punching with the edge of the palm.
- It remains to roll up the workpiece in the same way as we shape the loaf. That is, we connect the dough in half in length and punch along the seam with the palm of your hand (with the part that is closer to the wrist). Thus, an elongated cylindrical blank is obtained.
- If the dough starts to stick to the table, do not forget to sprinkle a little flour on it. We proceed to rolling out the workpiece. To do this, roll out the dough with both hands so that the workpiece looks like a spindle. In the middle, it is plump, and the ends are elongated to the edges.
- And now you need to shape the roll itself. To do this, first of all, we will fix the lock - this will be the handle of the Moscow roll. It is done simply: holding the workpiece belly a little on the weight, with the second hand, with a quick movement, we punch the thin ends of the dough overlapped on the table. Then we roll the handle back and forth across the table so that the seam joins and the handle becomes monolithic (that is, does not diverge).
- This is how the blank for the Moscow roll looks like after molding. In the same way we shape the remaining 3 parts of the dough, giving them the shape of locks.
- We transfer all 4 blanks to baking paper, which should be generously sprinkled with wheat flour. We put the future Moscow rolls with handles in the center, dust with flour and cover with cling film (it also needs to be rubbed with flour so that the top of the blanks does not stick). Leave at room temperature for 30-40 minutes.
- When the workpieces are apart, we proceed to the final stage of forming the Moscow rolls. We take a bread knife-saw and, holding the belly of the workpiece with one hand, make a double, rather deep cut. It needs to be very, very generously breaded in flour, rubbed right into this cut. I must say that here I was afraid to use too much flour, but in vain. It is because of this that the so-called lips of the rolls did not open completely during the baking process, since the dough was elementary partially stuck together in the places of the cut. Therefore, do not feel sorry for the flour, no matter how much it may seem.
- Thus, we cut all 4 blanks. We transfer them, along with a sheet of parchment, on which they were soaked, onto a hot (it was heated in the oven) baking sheet and bake in an oven preheated to 280 degrees for 15 minutes with steam. In other words, the Moscow rolls need to be baked at a very high temperature and high humidity. Steam can be created in two ways. Firstly, just throw a few large ice cubes into an already heated oven at the very bottom. Or put a bowl of water on the bottom of the oven in advance. In the process of baking this lean bread, steam will rise to the top, thereby helping the products to rise and the cuts to open. In addition, steamed baked goods contribute to a thin and tender crust in the finished bread.
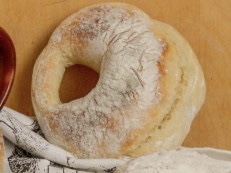
- Ready-made Moscow rolls do not differ too ruddy crust, since there is no baking in the dough, and they are not greased with anything.
- Remove the baked goods from the baking sheet and let cool on the wire rack.
- Fragrant Moscow rolls are wonderful pastries, very tasty, with a delicate well-textured crumb and the finest crispy crust. Despite their more than modest line-up, they are surprisingly good!
Kalach Moskovsky
- Serves: -
- Prepare Time: -
- Cooking Time: -
- Calories: -
- Difficulty:
Easy
One of the oldest types of white bread, which has been baked in Russia from time immemorial. In terms of texture and taste, ready-made Moscow rolls can be compared to French baguettes - they differ in the same well-bore crumb and thin crispy crust. It is believed that only professionals can cook a Moscow roll, but today I propose to break this stereotype and make it at home with your own hands!
In Ancient Russia, it was customary to bake rolls in the form of a castle with a round bow. These pastries were sold on the street, and the townspeople ate them right on the go, holding by this shackle (handle). Interestingly, for reasons of hygiene, the pen itself was not used for food - it was given to the beggars or thrown to the dogs. There is a version that about those people who did not disdain to eat the shackle from the roll, they said: "I got to the handle." Today the expression “to reach the pen” means to lose human form, to completely sink.
An exclusively Russian invention - the form and names for individual parts of the roll. The most prominent, plump part of this pastry is called the tummy. There is a lip on it (the upper swollen part, which is obtained by notching the workpiece). Well, and, of course, a handle, or, as it is correct, a bow (in ancient times it was called a re-bind). Each part of the roll is characterized by its own flavor nuances, since a different shape and volume, even with the same baking time, give a different degree of browning.
Its a bit of history. For a long time in Russia, not only Moscow kalachs, but also Murom ones were known. Murom rolls were made from sieve dough (that is, the flour was passed not through a sieve, but a sieve). The main feature of the Murom rolls crumb was its wellness. The dough for this baking was crushed (“rubbed”) with hands on ice for a long time, due to which the carbon dioxide contained in it did not evaporate, and the finished products turned out to be highly porous, with large internal voids. It is because of this that the second name for the Murom roll is grated.
Ingredients
Directions
- To prepare this simple but very tasty homemade bread, we will use premium wheat flour, warm water, salt and yeast. I use fast-acting yeast (1.5 grams), but you can replace it with dry in the same amount or pressed / fresh / wet (three times more, that is, 5 grams). In the second case, you need to dissolve the yeast with warm water and let it stand for 10-15 minutes, then combine with flour and salt.
- Sift 450 grams of premium wheat flour into a suitable dish to get rid of impurities. The remaining 50 grams are not needed yet - we will use this flour to form products.
- Add 8 grams of salt to the flour (1 teaspoon with a small pea) and half a teaspoon of fast-acting yeast (what kind of yeast you have, always read on the package).
- Mix the contents of the bowl thoroughly so that the salt and yeast spread evenly over the flour. We make a depression in the flour mixture and pour water into it. But not all at once, but for a start, about 300 milliliters (it took me exactly 315 milliliters). Then look at the consistency of the dough. We begin to delicately mix the ingredients, without much effort, but just so that everything is connected.
- The dough turns out to be a little sticky, loose, uneven and not smooth - it should be so. It is not necessary to knead it for a long time - the main thing is that there are no dry flour fragments left.
- Round the dough, wash the bowl and wipe it dry. Lubricate the dishes with a very small amount of vegetable oil (about a third of a teaspoon - I did not indicate this ingredient) just so that the dough does not stick. We tighten the bowl with cling film or cover with a towel so that the surface of the dough does not wind up and does not become crusty. We will have a two-phase dough fermentation process: first, it will ferment in warmth at room temperature (ideally 25 degrees), and then in a cool place (in the refrigerator). So, leave the dough warm for 1 hour.
- During this time, the dough will swell, become looser - the fermentation process has begun. In this recipe for homemade bread, we will use a technique called "stretch and fold", which means "stretch and fold" in English. This is how we will act on the dough (stretch and fold), due to which gluten will develop, and the dough itself is not only smooth, but also very porous. It must be said that this is the best way to passively develop gluten in the dough.
- I will try to show in the photo how it looks in the process without video. So, moisten our hands a little with water, take the far edge of the dough, spread it to the sides and fold it to the near side. At this stage, you will already notice a difference in the consistency and texture of the dough: it has become smooth, stretches well and does not tear.
- We turn the bowl over and repeat the manipulations: from the far edge we pull the dough with both hands (do not forget to moisten them in water after each time) and put it back to the near side. Due to the fact that we greased the dishes with oil, the dough practically does not stick to it, thus the gluten frame will be perfectly preserved.
- It remains to stretch and fold the dough in the same way two more times. From a narrower edge, stretch and fold the dough towards you, then turn the bowl over 180 degrees and repeat the action.
- It turns out to be an almost square workpiece.
- It must be turned over with the seam downward, parallel to giving the dough a slightly rounded shape. Now you will need to leave the dough at room temperature for another 2 hours, during which two similar folds should be made with an interval of 1 hour. That is, in total, it turns out 3 hours of fermentation in heat and 3 folds of the dough.
- After 3 hours at room temperature, the dough will change a lot: it will not only noticeably increase in volume, but will also become more porous and airy. When stretched, the dough stretches perfectly and does not tear.
- Now you need to stretch and fold the dough again, then turn the piece over with the seam down, tighten the bowl with plastic wrap and put it in the refrigerator. What is the need for cold fermentation? The fact is that at low temperatures the fermentation process slows down, while the accumulation of flavoring qualities becomes more intense. Thus, the dough ferments longer than in warmth, but the taste of the finished product is richer and more pronounced. The dough will stay in the refrigerator for another 1 hour and 40 minutes. It will need to be stretched twice more and folded every 50 minutes, after which it will be possible to mold future Moscow rolls.
- After the allotted time (almost 5 hours) of fermentation in warm and cold, the dough became somewhat stronger and more elastic - it does not blur and keeps its shape. In addition, the dough is no longer too sticky.
- Remember we left 50 grams of wheat flour? And now we need it. Lightly dust the work surface with flour and put the dough out of the bowl.
- In total, we will get 4 rather large Moscow rolls, so we divide the dough into 4 parts. This is most conveniently done with a scraper, but you can cut it with a knife.
- Now, for accuracy, you need to weigh the pieces of dough. By the way, it is best to immediately weigh the entire dough, so that later it will be more convenient to calculate the required mass of each piece. An equal amount is needed not only for greater aesthetics, but also so that the workpieces are deformed at the same speed and baked at the same time.
- Carefully squeeze a little air out of the dough, round off the pieces of dough, rolling them into denser pieces. Let them rest for 10 minutes at room temperature, covering them with cling film or a towel so that the top does not wind up.
- After 10 minutes, the dough will rest and relax - you can proceed to molding the Moscow rolls.
- To do this, we spread the blank into a flatter cake, gently pressing the dough with our fingers to the table. Just don't press hard to keep the air out.
- Now we spread the far edge of the dough with our fingers to the sides and press it to the center. We seal the seam (just with the edge of the palm we punch the dough with a quick but clear movement).
- Turn the workpiece over 180 degrees and repeat the movement from the opposite side.
- Seal the seam again with a short punching with the edge of the palm.
- It remains to roll up the workpiece in the same way as we shape the loaf. That is, we connect the dough in half in length and punch along the seam with the palm of your hand (with the part that is closer to the wrist). Thus, an elongated cylindrical blank is obtained.
- If the dough starts to stick to the table, do not forget to sprinkle a little flour on it. We proceed to rolling out the workpiece. To do this, roll out the dough with both hands so that the workpiece looks like a spindle. In the middle, it is plump, and the ends are elongated to the edges.
- And now you need to shape the roll itself. To do this, first of all, we will fix the lock - this will be the handle of the Moscow roll. It is done simply: holding the workpiece belly a little on the weight, with the second hand, with a quick movement, we punch the thin ends of the dough overlapped on the table. Then we roll the handle back and forth across the table so that the seam joins and the handle becomes monolithic (that is, does not diverge).
- This is how the blank for the Moscow roll looks like after molding. In the same way we shape the remaining 3 parts of the dough, giving them the shape of locks.
- We transfer all 4 blanks to baking paper, which should be generously sprinkled with wheat flour. We put the future Moscow rolls with handles in the center, dust with flour and cover with cling film (it also needs to be rubbed with flour so that the top of the blanks does not stick). Leave at room temperature for 30-40 minutes.
- When the workpieces are apart, we proceed to the final stage of forming the Moscow rolls. We take a bread knife-saw and, holding the belly of the workpiece with one hand, make a double, rather deep cut. It needs to be very, very generously breaded in flour, rubbed right into this cut. I must say that here I was afraid to use too much flour, but in vain. It is because of this that the so-called lips of the rolls did not open completely during the baking process, since the dough was elementary partially stuck together in the places of the cut. Therefore, do not feel sorry for the flour, no matter how much it may seem.
- Thus, we cut all 4 blanks. We transfer them, along with a sheet of parchment, on which they were soaked, onto a hot (it was heated in the oven) baking sheet and bake in an oven preheated to 280 degrees for 15 minutes with steam. In other words, the Moscow rolls need to be baked at a very high temperature and high humidity. Steam can be created in two ways. Firstly, just throw a few large ice cubes into an already heated oven at the very bottom. Or put a bowl of water on the bottom of the oven in advance. In the process of baking this lean bread, steam will rise to the top, thereby helping the products to rise and the cuts to open. In addition, steamed baked goods contribute to a thin and tender crust in the finished bread.
- Ready-made Moscow rolls do not differ too ruddy crust, since there is no baking in the dough, and they are not greased with anything.
- Remove the baked goods from the baking sheet and let cool on the wire rack.
- Fragrant Moscow rolls are wonderful pastries, very tasty, with a delicate well-textured crumb and the finest crispy crust. Despite their more than modest line-up, they are surprisingly good!
You may also like


.jpg)


